2 hours ago, on March 12 2018 Adobe released CC2018 version 22.1. This new version may mark the end of Legendary Open Multipage PDF script, since Adobe finally caught up with times and now it allows us to open multipage pdf files.
“How do I crop a Photo in Illustrator?” is the All-Time hottest topic in the Adobe Illustrator Forum, there’s a long thread with answers that go from “not possible”, to “use Photoshop”, to “use clipping masks”, to “use Artboards”. The thread also has the real answer to the question, cropping raster images in Illustrator is possible using a “cutter” path with a blending mode other than Normal, then Flattening Transparency. Great answer!! now this script tackles on the same principle as Flattening Transparency, it rasterizes the image within the bounds of the “cutter” path and discards what’s outside of the path bounds.
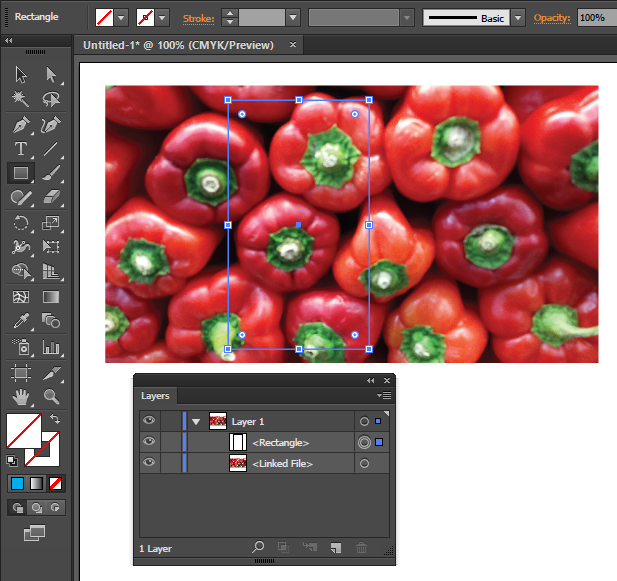
to use the script to Crop this image
draw a rectangle on top of the image to use as “cutter” path
select both, the image and the “cutter” path
run the imageCrop script
that’s all, the image gets cropped, embedded, unwanted pixels get discarded. If you don’t want your images to get destroyed, please use the other Masking methods.
Script Features
Press Shift Key before running the script to Rasterize using TypeOptimized option otherwise the script will use default ArtOptimized Press Alt Key before running the script to Rasterize using custom Resolution, otherwise the script will use an average of the base image resolution.
Scripting Adobe Illustrator is painful at times, we don’t have access to some of the most useful features available to us manually using the UI, and we also don’t have the luxury of major upgrades to the DOM as ID or PS users have enjoyed for years. With the release of CS6 some years back, Adobe surprised us with a couple of new, although undocumented commands that seemed to have great potential. One of them was executeMenuCommand(menuCommandString), the string syntax was missing, but fortunately it was quickly found out by some talented scripters, proving its value, and becoming one of the most, if not the most powerful command available.
The other command released with CS6 was applyEffect(liveEffectXML), which also had its string syntax missing, till now…well, without further ado, here’s an example
// apply offset path live effect to selected path
var idoc = app.activeDocument;
var ipath = idoc.selection[0];
xmlstring = ‘<LiveEffect name=”Adobe Offset Path”><Dict data=”R mlim 4 R ofst 20 I jntp 2 “/></LiveEffect>’;
ipath.applyEffect(xmlstring);
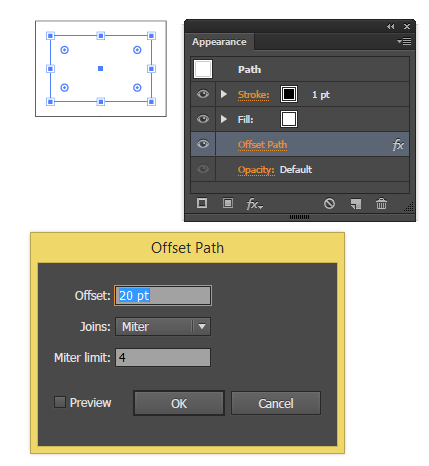
the important part of the string is the data, mlimis the MiterLimit Value “4”, ofstis the Offset Value “20”, jntpis the Join Type “2” for Miter.
How to get the XML string parameter
To get the right xml string for a particular Effect, fire up Illustrator CS5 or CS6, draw a rectangle, apply a Live Offset Path as show above, then save your file as FXG
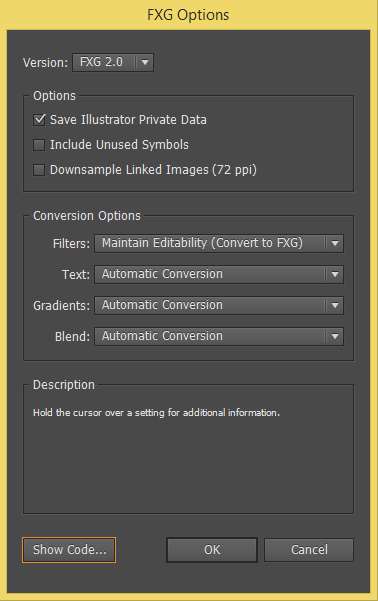
Make sure “Save Illustrator Private Data” is selected, then click on “Show Code…”, you’ll get the xfg text file generated.
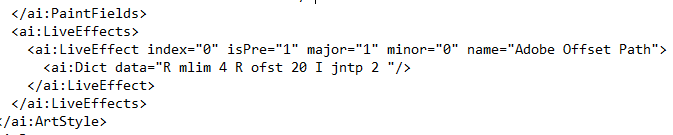
Look for the LiveEffect tag and get the name and the Dict data from it as shown below
<LiveEffect name=”Adobe Offset Path”><Dict data=”R mlim 4 R ofst 20 I jntp 2 “/></LiveEffect>
that’s all, that’s the xml string you need to add to your script.
I would like to thank Adobe’s Sanjay Kumar, without his input this command would have not seen the light of day.
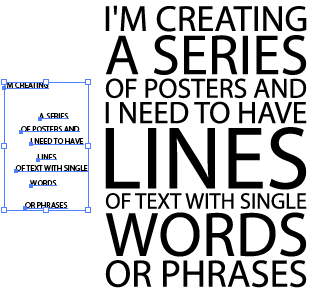
This script creates a “Block” of text out of Selected Point Text Items, that is, it re-sizes each frame so they all have the same width. Back then when I wrote the script I didn’t know this layout style was called “SlabType”, otherwise I would have picked a more suitable name, anyway, here’s my “textBlock” script. Please note that the final Block of Text is converted to Outlines.
The Armature Drag N Drop Wireframing Tool
for Illustrator
Ready-made Objects for Just About Everything
Conceptualize web and mobile layouts quickly and efficiently by simply adding objects to any artboard. Armature’s well-organized, fully searchable library contains headers, footers, menus, tabs, toggles, tooltips, placeholders, content blocks, form elements and even complete layouts—the list goes on.
I made a video showing how Armature works. The extension is pretty neat and easy to use. I was very pleasantly surprised! I believe this will be a tool that I will use over and over again to conceptulize web sites I create before going into WordPress and creating them.
Here is the front page wireframe I made with Armature.
Highlights:
Easily Build Your Own Wireframes No need to purchase a separate wireframing program or hire someone else to handle building out your site’s wireframes. Now with the Armature wireframing extension to Adobe Illustrator, you can create your own wireframes.
Simple to Use If you’re familiar with Illustrator, creating wireframes will be a snap. Simply add objects to any artboard and you’ll quickly have your wireframes built out. Just use the drag-and-drop functionality to put things in place. It couldn’t be easier!
Highly Organized, Resourceful Library Armature’s library isn’t just well organized, it’s also highly searchable. You’ll find everything you need to build a website including headers, menus, tabs, footers, placeholders, tooltips, toggles, content blocks, form elements, and more!
Web and Mobile You can use Armature to build wireframes not just for the Web but for mobile devices as well. The panels include everything you’d need to quickly build mobile views.
Complete Layouts You’ll get a number of complete layouts to make your wireframing even easier. Take advantage of complete layouts such as blogs, ecommerce, portfolios, sign-ins, calendars, and tables!
To get the easy to use Illustrator extension wireframing tool go to getarmature.com
Illustrator’s Title Case function is…how do we say it nicely?…hmm…it is very straight forward, it capitalizes the first letter of every word. While it works on some scenarios, it simply doesn’t cut it for properly capitalizing titles.
Illustrator’s simple Title Case
The Quick Brown Fox Jumps Over The Lazy Dog
Proper Title Case
The Quick Brown Fox Jumps over the Lazy Dog
to use, select a portion of text (referred as text Range) or one or more text Frames before running the script.